
Pre-rendering ThoughtSpot Embed components
Table of Contents
Before implementing pre-rendering, let’s understand how embedding ThoughtSpot works in a typical web app.
How embedding works🔗
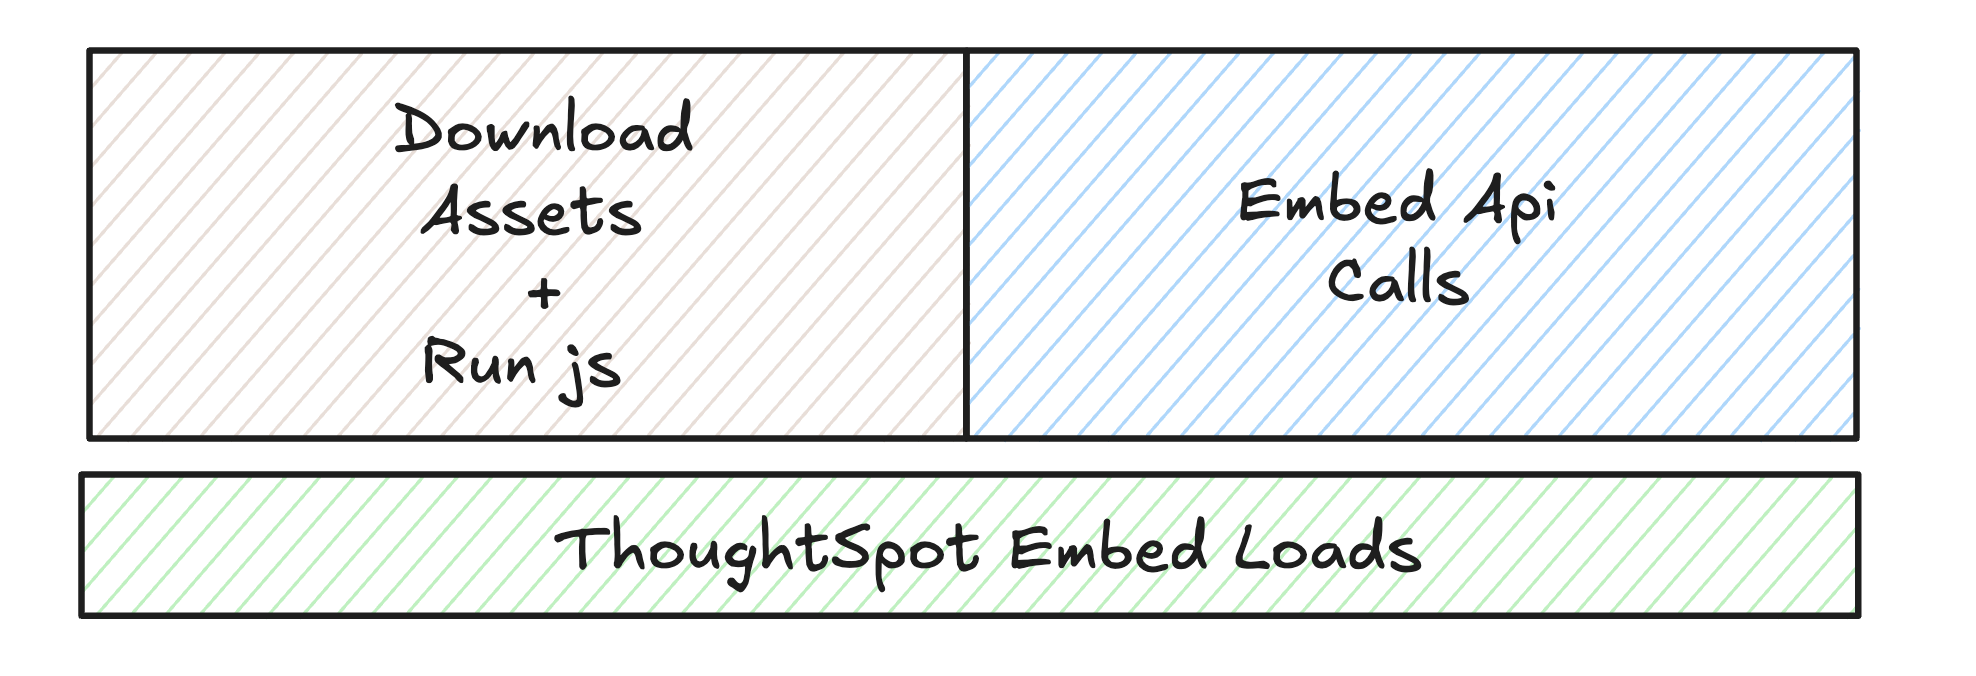
ThoughtSpot is a web app, and like any modern web application, it requires two main things to function:
-
Assets - The static files your browser needs to display and run the application, such as JavaScript files, CSS files, fonts, and images.
-
API Calls: These are network requests made from the browser to the ThoughtSpot backend to fetch:
-
Data (the actual analytics, tables, charts, and so on)
-
Metadata (information about users, tables, permissions, and so on)
-
When you embed ThoughtSpot into your application, the browser must first download all required assets. Once these assets are loaded, the application executes its JavaScript code, which then initiates API calls to fetch the data and metadata necessary to render analytics for the user.
How ThoughtSpot optimizes asset and API loading🔗
ThoughtSpot internally optimizes the loading process by splitting assets and API calls, so that only the files and data needed for a specific component are loaded when required. This means:
-
For embed components such as Search, Liveboard, and Spotter, only the assets and API calls required for that component are loaded.
-
There are a few common assets such as fonts, shared JavaScript, CSS, and common API calls to fetch user information, that are always loaded, as they are used across all embed types.
-
In addition to these common resources, each component (for example, Liveboard) will load its own specific JavaScript, CSS, and make API calls only needed for that component.
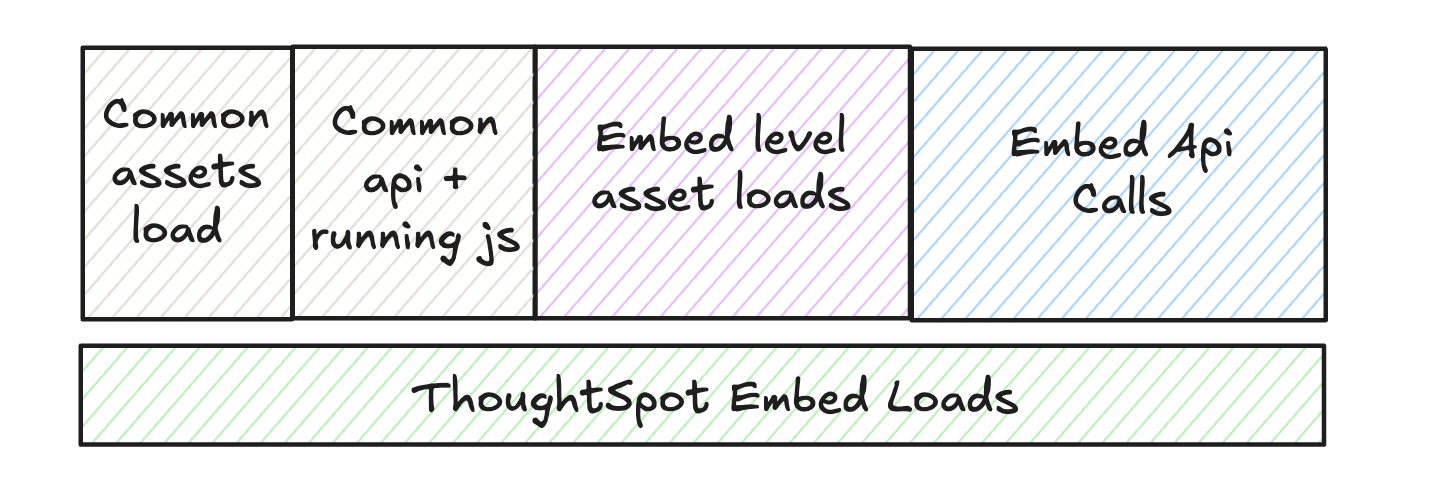
For example, if you are embedding a Liveboard:
-
The browser first loads the common assets and makes common API calls for resources such as fonts and user information.
-
Then, it loads the Liveboard-specific JavaScript and CSS files, and make the necessary API calls to fetch Liveboard data.
-
Assets and API calls for other components, such as Search or Spotter, are not loaded unless those components are actually used.
This approach ensures that the embed is efficient, loading only what is necessary for the user’s current experience, and helps improve performance by reducing unnecessary downloads and network requests.
Before getting started with pre-rendering, let’s understand the essential first step in embedding ThoughtSpot.
init call🔗
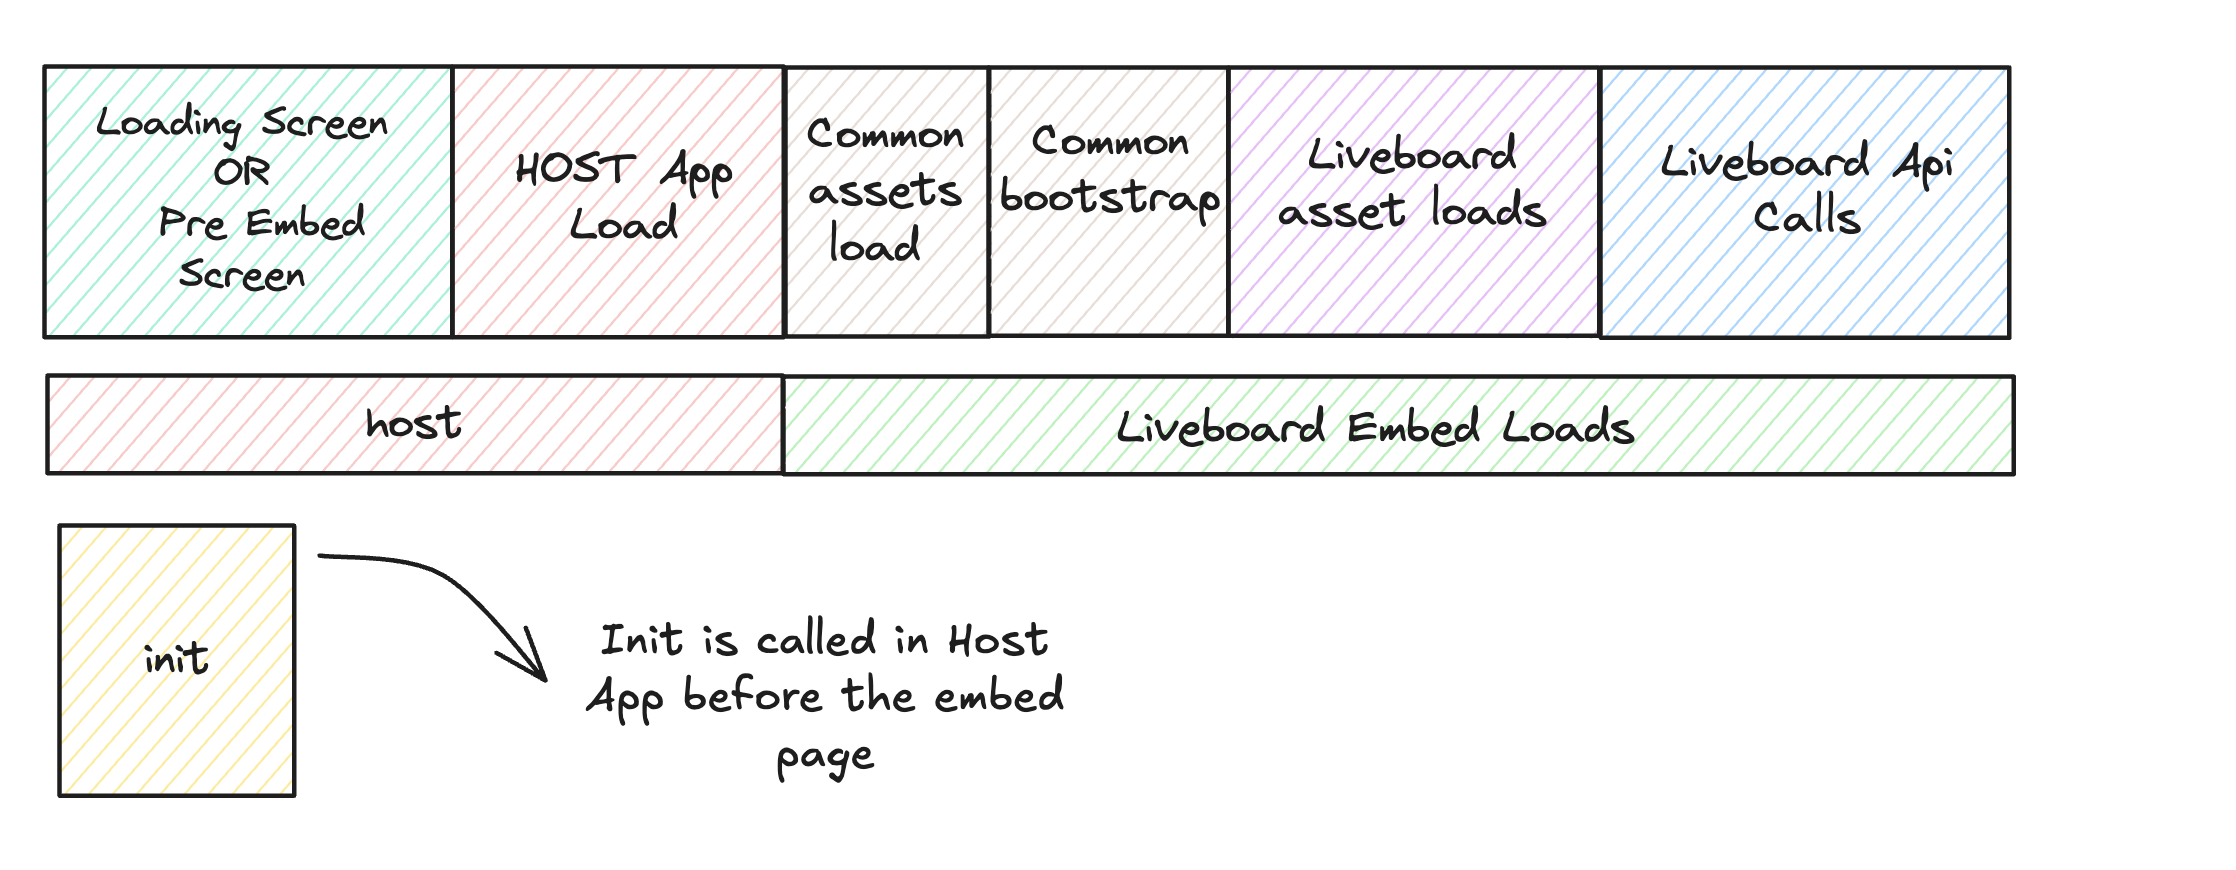
In ThoughtSpot embedding, init is first essential step. Before you can render any ThoughtSpot embed component, you must call the init method from the Visual Embed SDK. This function initializes the SDK and sets up the connection to your ThoughtSpot instance. It is the required starting point for any embedding scenario.
When should you call init?🔗
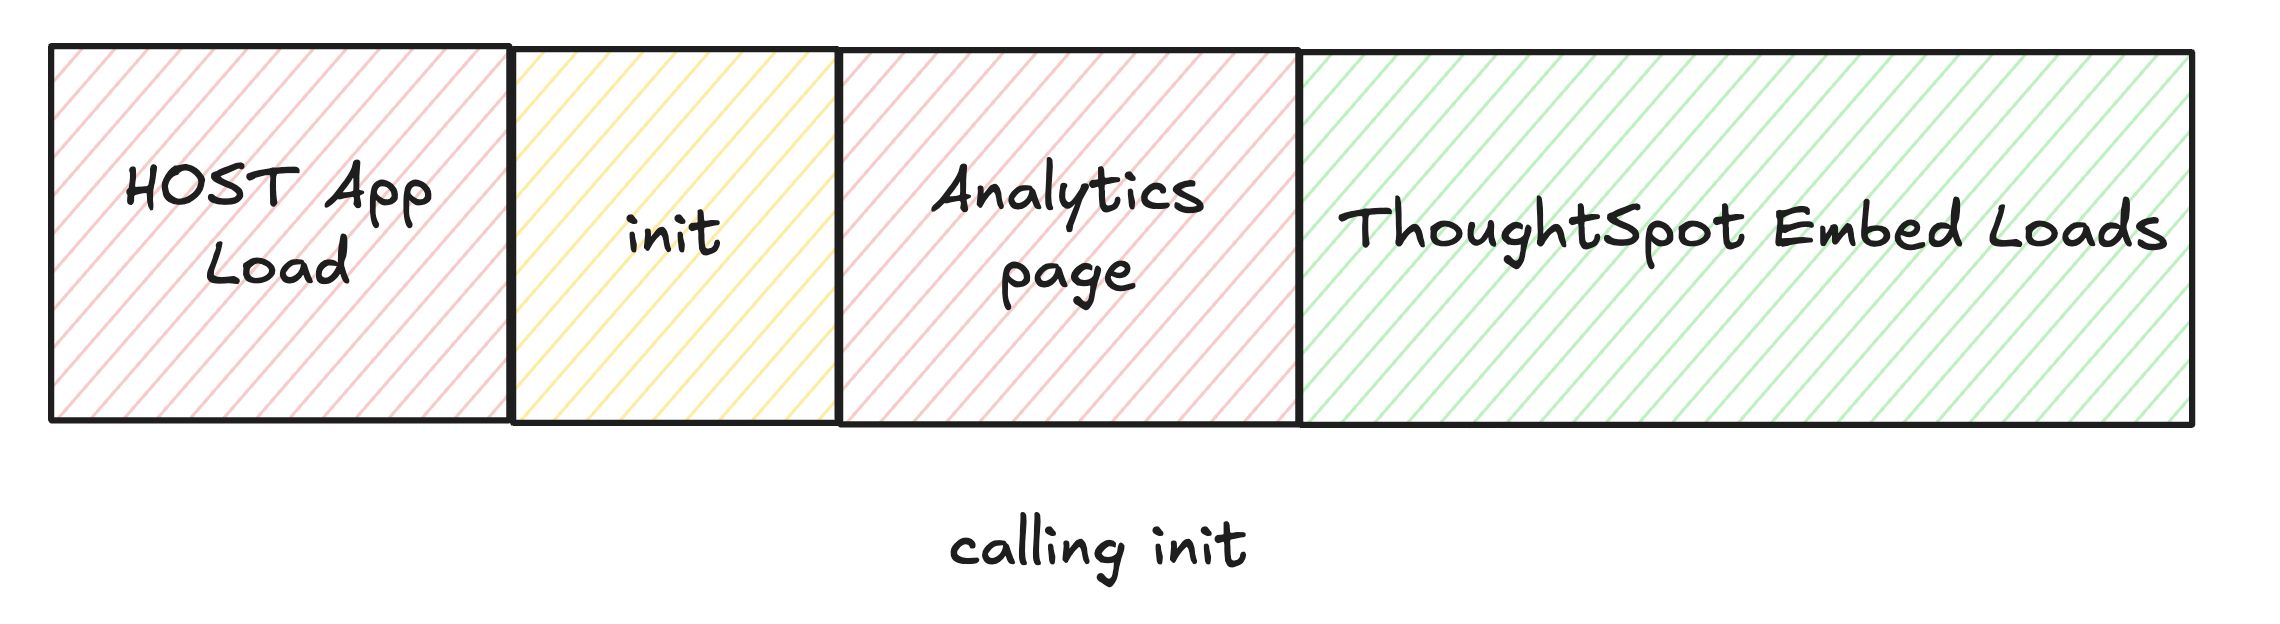
Call init as early as possible in your application lifecycle, ideally on your app’s initial load, landing page, or loading screen.
The init call is very lightweight; it does not trigger heavy asset downloads or make many API calls. Therefore, there is no downside to calling it early, and it ensures that subsequent embed loads are as fast as possible.
|
Note
|
Always call |
Pre-rendering overview🔗
Now that you know how ThoughtSpot loads assets and data, let’s explore how you can make the experience even faster for your users.
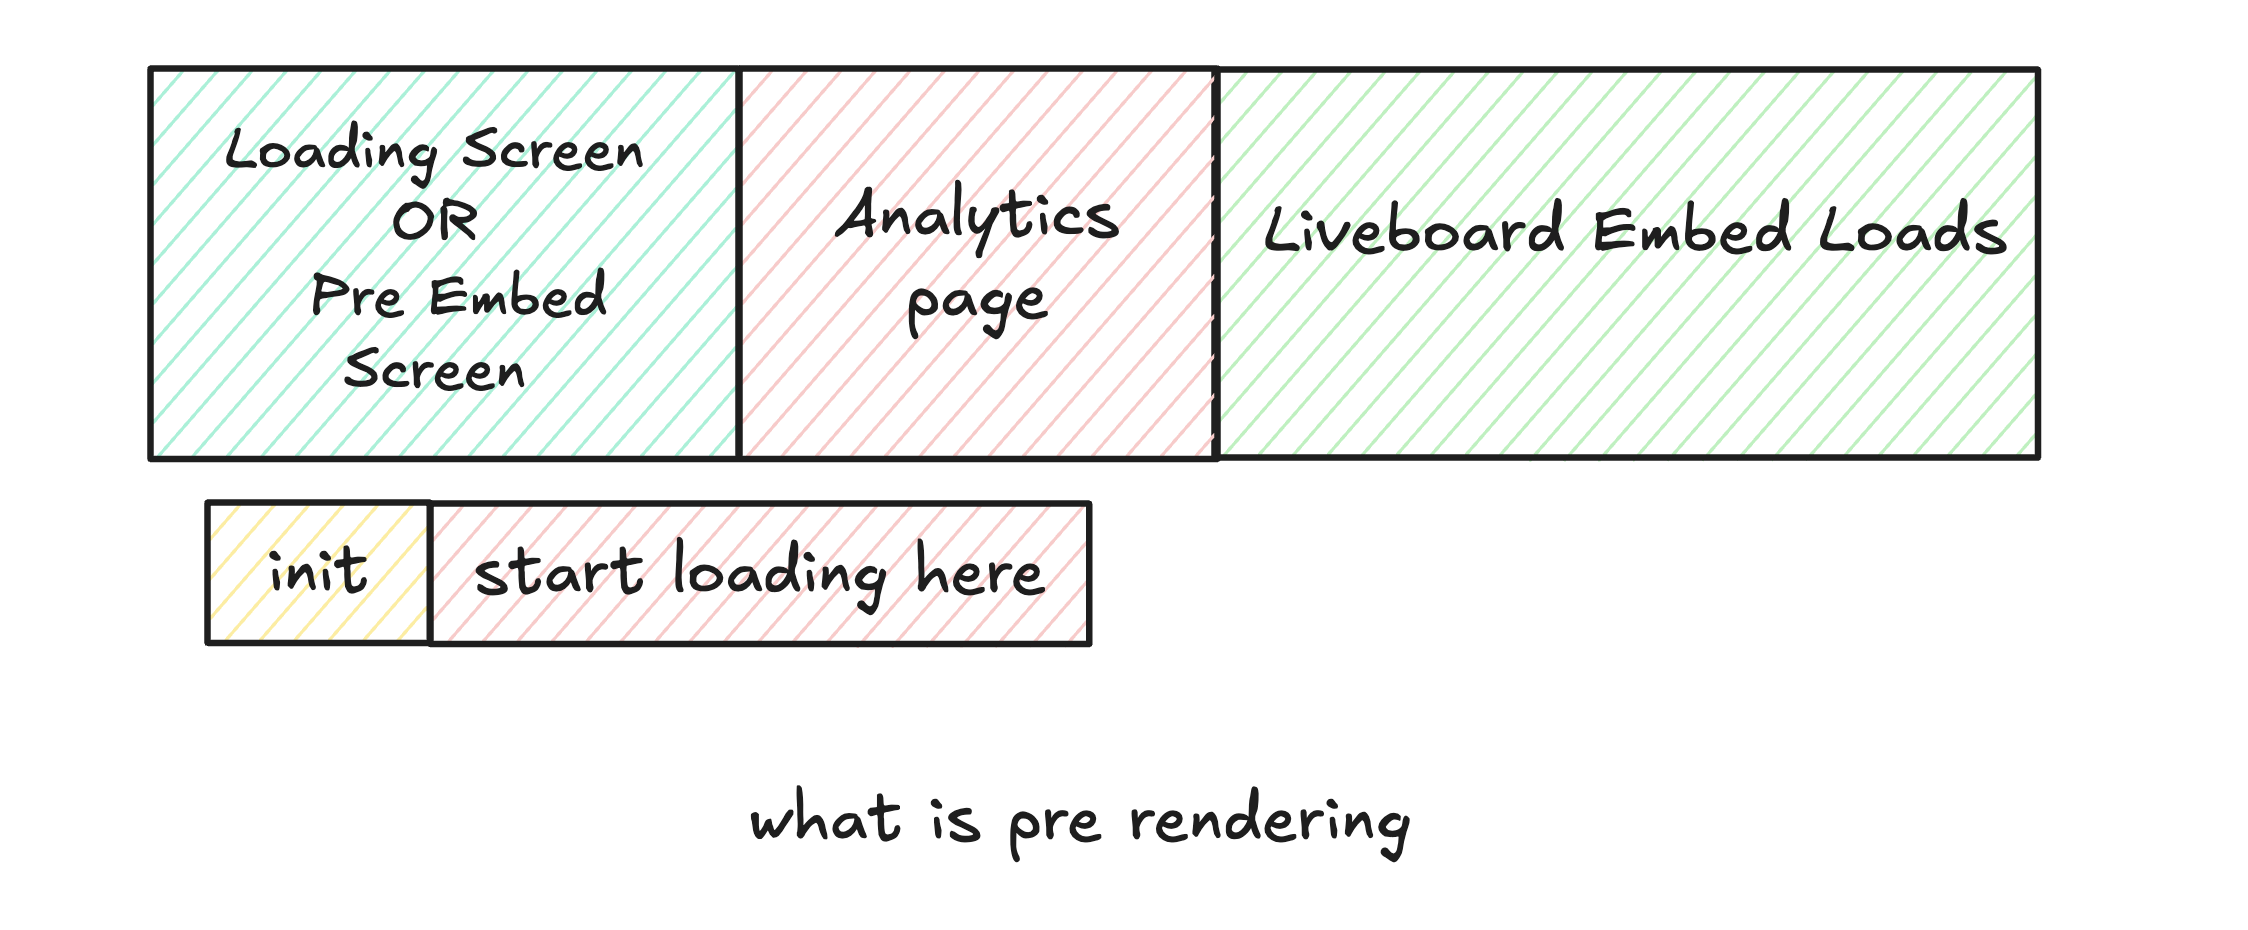
Consider the scenario, where you have an app with a landing screen where users spend some time before navigating to the embedded ThoughtSpot page. In the current setup, ThoughtSpot only starts loading when the user actually visits the analytics page. What if you could start loading some of ThoughtSpot’s essential files and data while users are still on the landing screen, before they reach the analytics page?
That’s exactly what pre-rendering does! By starting the load process early, you can make the analytics appear much faster when the user finally navigates to that page.
Terminology used in this guide🔗
Keeping the above in mind, let’s define a few key terms that we’ll use later in this guide:
-
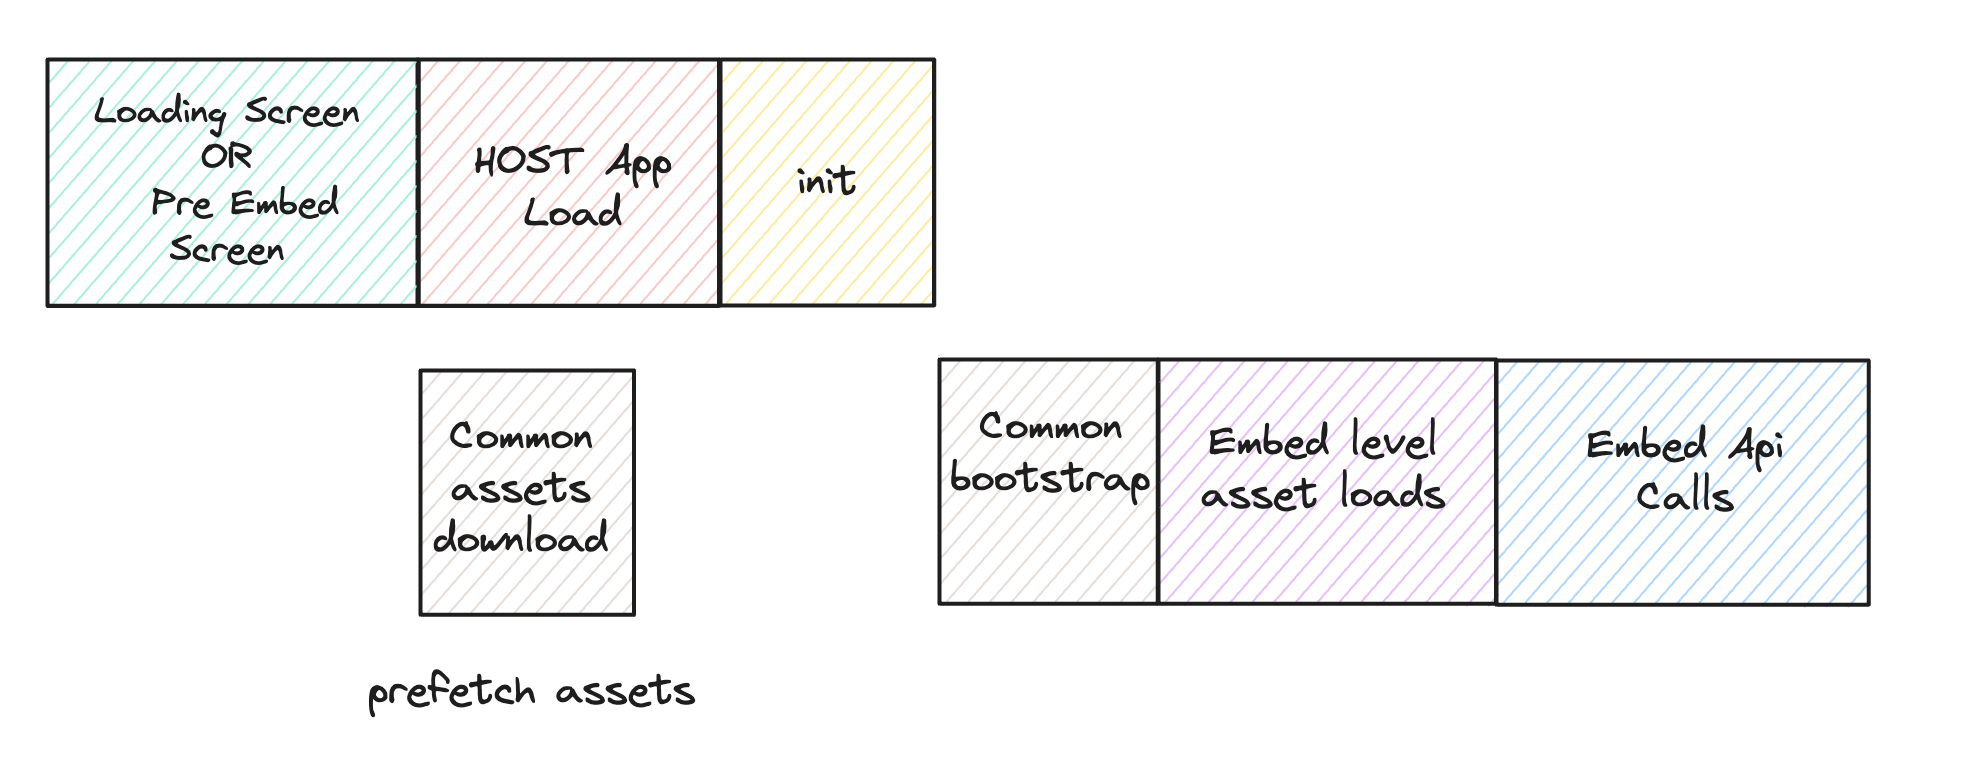
Common asset download – The shared JavaScript and CSS files that every embed needs
-
Common API calls – The basic API requests made for things like user info, used by all embed types
-
Embed level asset download – The specific files (like JS and CSS) needed only for the embed type you’re using (for example, Liveboard or Search)
-
Embed API calls – The API requests made to fetch the actual data and content for the specific embed (like loading a Liveboard’s data)
-
Host app – This is your web application (the main app your users interact with)
-
Analytics page – This is a page in your web app where ThoughtSpot is actually embedded
How to use pre-rendering?🔗
Based on your use case, you can choose to pre-render the embed in one of the following ways:
Pre-render with Liveboard ID🔗
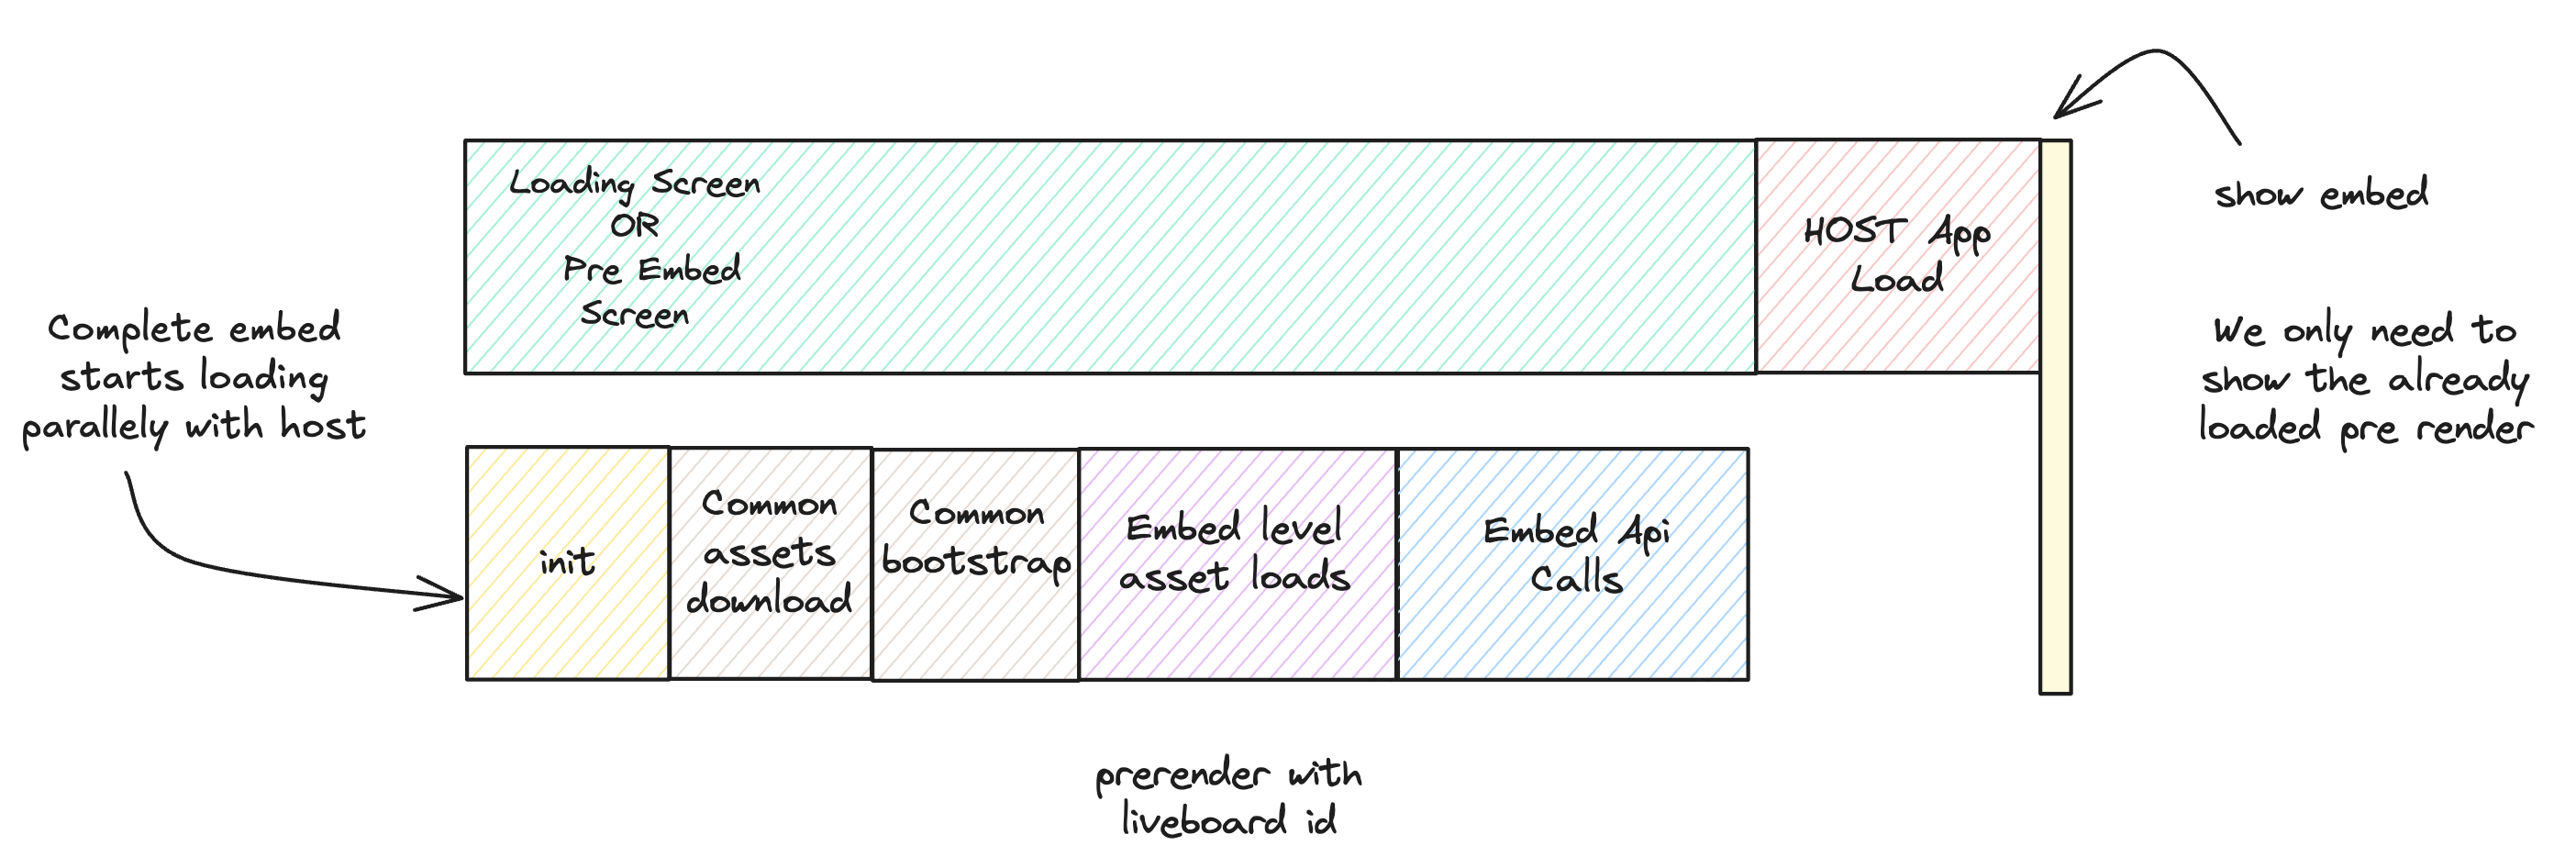
In this approach, you load everything all at once. When the user navigates to the analytics page, the embed is already loaded and ready to show.
-
Fully loads the embed iframe, including all assets and Liveboard data, as soon as the component is rendered.
-
Fastest experience for a specific Liveboard.
-
Maximum resource usage if the end user never views the embed.
Implementation🔗
In your application’s home page, loading page, or landing page, you need to prerender the embed with the Liveboard ID.
// React
<PreRenderedLiveboardEmbed
  liveboardId="e40c0727-01e6-49db-bb2f-5aa19661477b"
  preRenderId="pre-render-with-liveboard-id"
/>
OR
// JavaScript
import { LiveboardEmbed } from '@thoughtspot/visual-embed-sdk';

const embed = new LiveboardEmbed({
  liveboardId: 'e40c0727-01e6-49db-bb2f-5aa19661477b',
  preRenderId: 'pre-render-with-liveboard-id',
});

embed.preRender();
When you actually want to show the Liveboard, call this component:
// React
<LiveboardEmbed
  preRenderId="pre-render-with-liveboard-id"
  liveboardId="e40c0727-01e6-49db-bb2f-5aa19661477b"
/>
OR
// JavaScript
import { LiveboardEmbed } from '@thoughtspot/visual-embed-sdk';

const embed = new LiveboardEmbed({
  liveboardId: 'e40c0727-01e6-49db-bb2f-5aa19661477b',
  preRenderId: 'pre-render-with-liveboard-id',
});

embed.render();
This approach is the fastest way to load the embed, but it is also the most resource-intensive. The makes calls to the ThoughtSpot API to fetch the Liveboard data and metadata, which might be unwanted if the end user never views the embed.
Pre-render without the Liveboard ID🔗
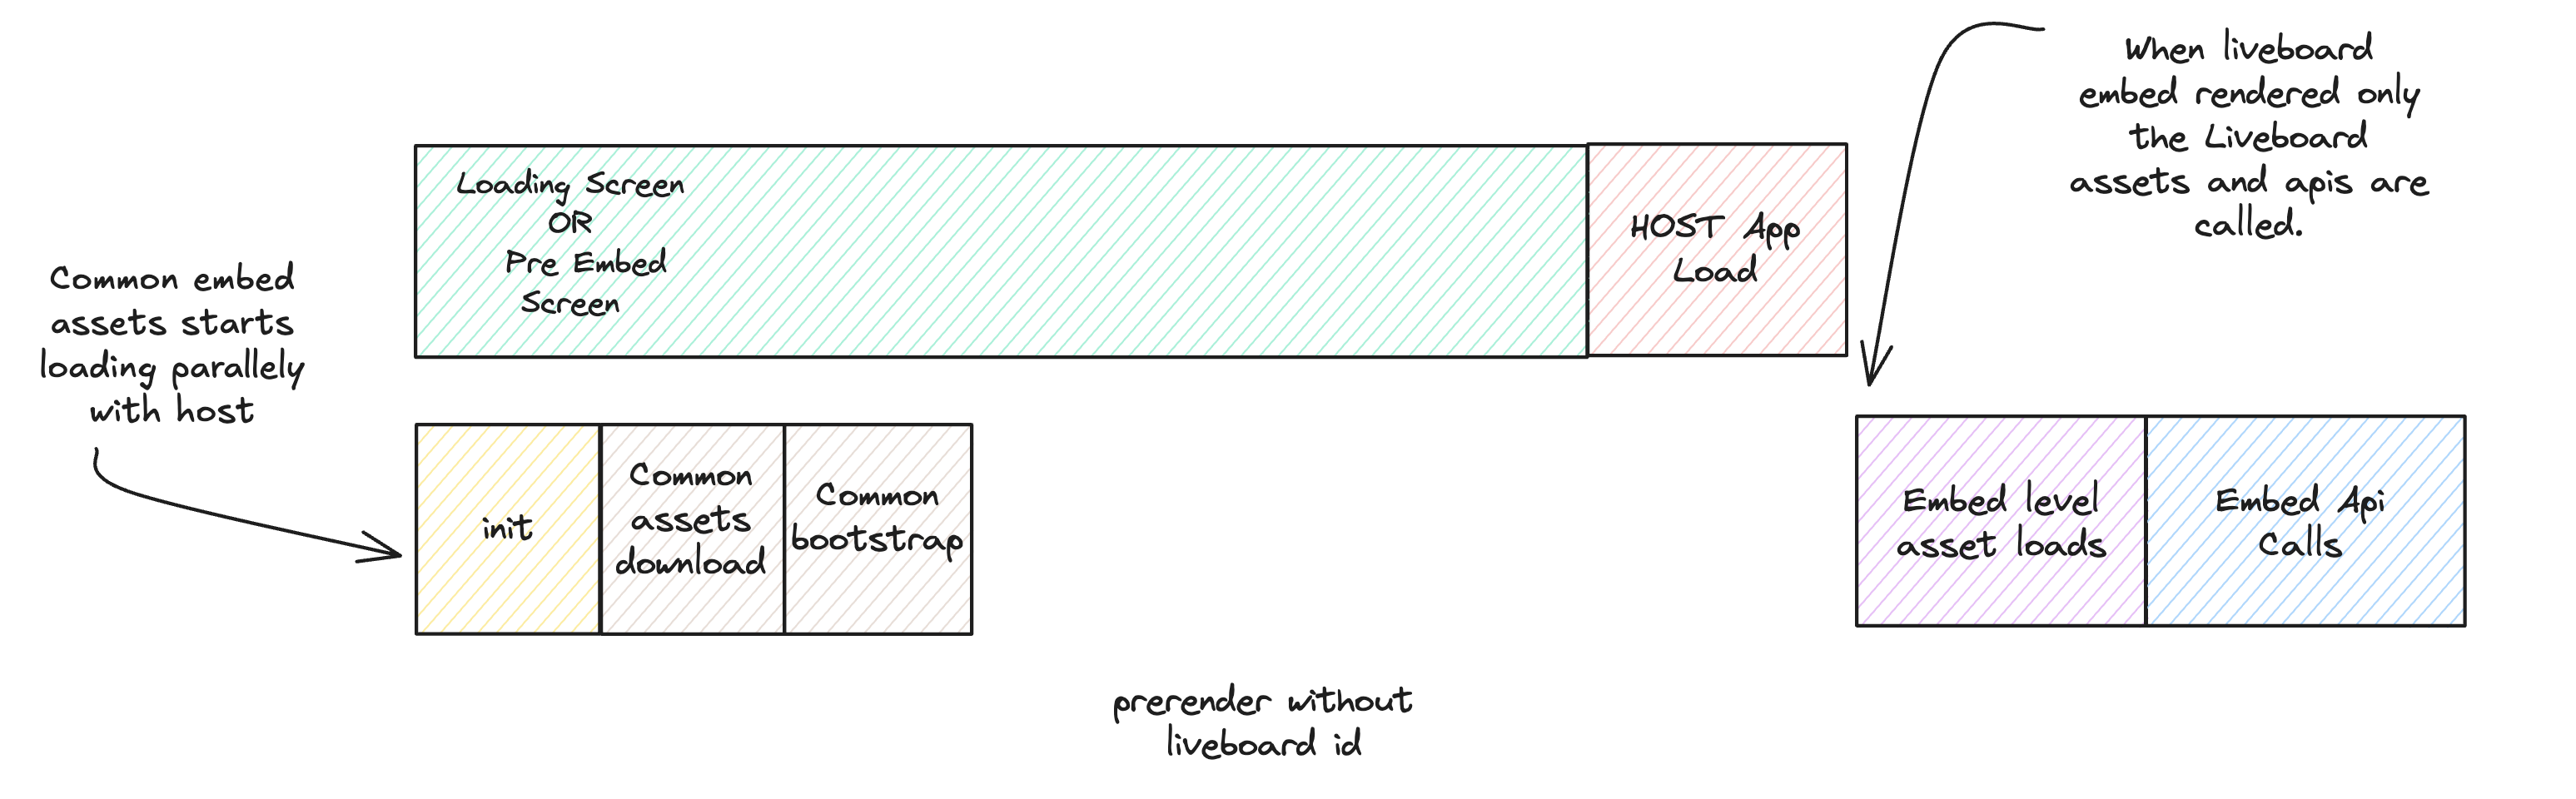
In this approach, you load the common assets and common API calls early, but you defer the Liveboard-specific data/API calls until needed.
-
Loads common assets and bootstrap logic early.
-
Defers Liveboard-specific data/API calls until needed.
-
Keeps the app ready, making the first Liveboard load faster.
-
Still loads some assets even if the end user never opens the embed.
To use this strategy, place the following component on your application’s home page, loading page, or landing page (before the end user navigates to the analytics):
<PreRenderedLiveboardEmbed
  preRenderId="pre-render-without-liveboard-id"
/>
OR
// JavaScript
import { LiveboardEmbed } from '@thoughtspot/visual-embed-sdk';

const embed = new LiveboardEmbed({
  preRenderId: 'pre-render-without-liveboard-id',
});

embed.preRender();
When you actually want to show the Liveboard, call this component:
<LiveboardEmbed
  preRenderId="pre-render-without-liveboard-id"
  liveboardId="e40c0727-01e6-49db-bb2f-5aa19661477b"
/>
OR
// JavaScript
import { LiveboardEmbed } from '@thoughtspot/visual-embed-sdk';

const embed = new LiveboardEmbed({
  preRenderId: 'pre-render-without-liveboard-id',
  liveboardId: 'e40c0727-01e6-49db-bb2f-5aa19661477b',
});

embed.render();
This approach is more efficient than the previous one, but it does not load the Liveboard data and metadata until the end user actually navigates to the analytics page. So users might see a loading state for a few seconds before the Liveboard is loaded.
Pre-render on demand🔗
If you do not want your host app to fetch any ThoughtSpot resources during its initial load, this approach is ideal.
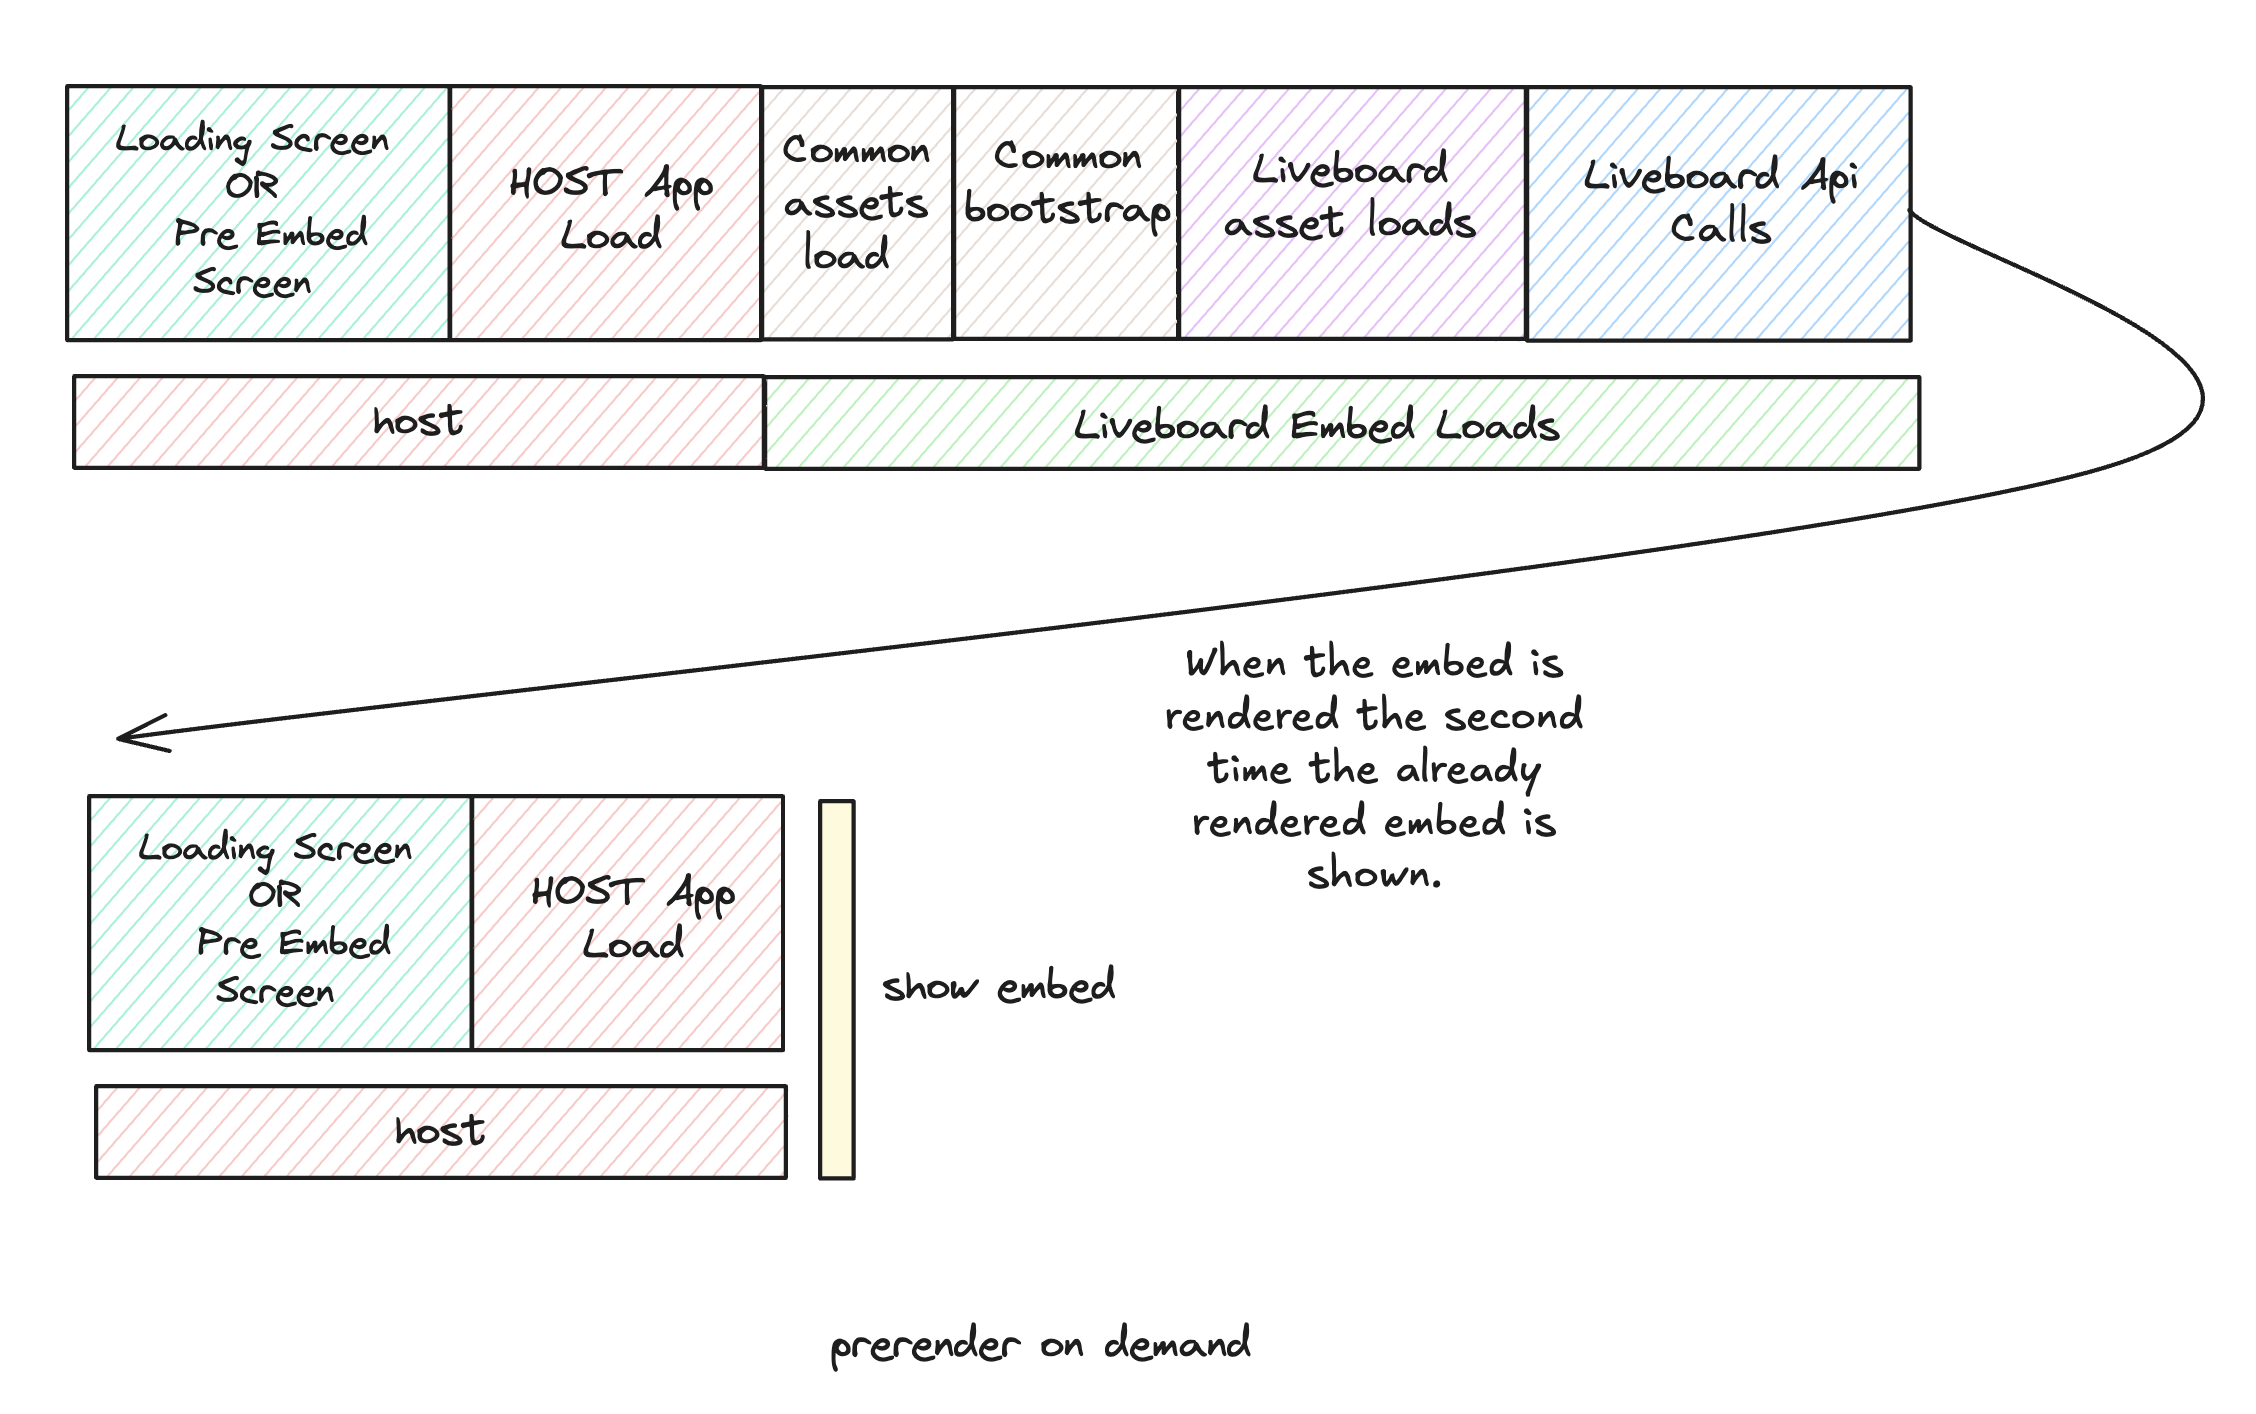
In this mode, nothing is fetched until you actually render the embed. On the first render, all required assets and data are loaded. The iframe is then kept alive in the browser, so subsequent renders with the same preRenderId are instant because the existing iframe is reused.
-
Loads nothing up front; the embed is created only when the end user navigates to it.
-
First visit loads normally; subsequent visits with the same
preRenderIdreuse the iframe and appear instantly. -
Most resource‑efficient; loads only if needed and avoids repeated work by reusing the iframe.
-
Performance benefit is realized only when the user navigates back to the analytics page; the first visit behaves like a normal render.
Since we are not 'preloading' any assets or data, this strategy does not require any pre-render component, simply pass a preRenderId prop to your normal component render.
<LiveboardEmbed preRenderId="pre-render-on-demand" liveboardId="e40c0727-01e6-49db-bb2f-5aa19661477b" />// JavaScript
import { LiveboardEmbed } from '@thoughtspot/visual-embed-sdk';
const embed = new LiveboardEmbed({
preRenderId: 'pre-render-on-demand',
liveboardId: 'e40c0727-01e6-49db-bb2f-5aa19661477b',
});
embed.render();The value of preRenderId can be any string, but it must match the preRenderId you use when rendering the actual embed later.
Normal Render🔗
-
Default behavior. Loads the embed only when the component is rendered.
-
On every visit, the iframe is recreated and the embed loads from scratch.
-
Efficient if the embed is rarely used, but slow for the end user every time.
<LiveboardEmbed liveboardId="some-liveboard-id" />// JavaScript
import { LiveboardEmbed } from '@thoughtspot/visual-embed-sdk';
const embed = new LiveboardEmbed({
liveboardId: 'some-liveboard-id',
});
embed.render();Prefetch assets🔗
-
Loads a few common JS/CSS assets in parallel with your app.
-
No Liveboard data or API calls are made.
-
Minimal benefit. As modern browsers already cache static assets efficiently, using prefetch may not provide a significant performance gain.
-
Wastes bandwidth if the end user never opens the embed.
import {
   prefetch,
   PrefetchFeatures
} from '@thoughtspot/visual-embed-sdk';

prefetch("https://<hostname>:<port>", [
  PrefetchFeatures.LiveboardEmbed,
  PrefetchFeatures.VizEmbed
]);
Strategy Comparison Table🔗
| Strategy | Loads in Parallel | Loads Data If Not Used | Loads Assets If Not Used | Reuses Iframe | Perceived Load Speed | Notes |
|---|---|---|---|---|---|---|
Normal Render | ❌ | ✅ No | ✅ No | ❌ | ❌ Slowest | No reuse; re-renders every time |
Prefetch | ✅ (few assets) | ✅ No | ⚠️ Yes (small assets) | ❌ | ⚠️ Slight improvement | Browser cache often makes it redundant |
Prerender + ID | ✅ | ❌ Yes | ❌ Yes | ✅ | ✅✅✅ Fastest | Best UX, worst resource efficiency |
Prerender w/o ID | ✅ | ✅ No | ⚠️ Yes (partial assets) | ✅ | ⚠️ Moderate | Trade-off between prep and efficiency |
On Demand | ❌ | ✅ No | ✅ No | ✅ | ✅ (on revisit), ❌ (first visit) | Best balance of performance and efficiency |
Advanced Troubleshooting🔗
-
If the pre-rendered component does not appear, check that the container is visible and the coordinates are set.
-
The iframes are saved as a child components to the body and not in the given target element.